fleurishment
FLEUR-ish-ment {noun} \ˈflər-ish-mənt, ˈflə-rish-\ 1. Something that flowers or flourishes with joyful abandon. 2. To grow luxuriantly, or thrive in growth, as in a blossoming plant. 3. To make dramatic, sweeping gestures that extravagantly bedeck your environs.
Saturday, January 24, 2015
DIY Upholstered Headboard from Cheap-O Art Canvases, Foam & a Shower Curtain
Do you LOVE the look of all those gorgeous upholstered Headboards? They just scream "cozy" and "snuggle in".
Then you see the $1K price tag, and you decide that the headboard can stay in the DREAM section of your life for a while longer....
Or NOT!
I wanted a headboard for my 'tween son's room. Spending big bucks for it was not possible (or smart)...so my noggin started thinking about making one. I have made one before (it's in my guest room) and it turned out great, but its foundation was specially cut pieces of plywood. This made it both heavy and unwieldy. Hard to get home, hard to assemble, hard to put together even with assistance from my Dad. What if I could find a way to construct it out of something that had less weight and had components that I could easily find, were cheap and could bring home without renting a flatbed truck?! Think think think....
I paint pictures. Frequently. Which means that I have various un-painted canvases hanging around in my storage almost all the time (for when inspiration strikes!). I recently did some very large (4ft x 5ft) paintings, and as I was painting them, I thought...hmmmm... if this canvas was on its side, it would be exactly 60 inches wide which (double hmmm) is the exact width of a Queen Sized Bed! If I could upholster this canvas with foam, batting and fabric, then I could hang it on the wall securely and it would look and function like a fabulous upholstered headboard! Cool!
I am always pushing the boundaries (downward) of cheap-o-ness, I wondered if I could get the price for the canvas frame even lower...like half. Well, at a 50% discount of the $99.99 price at Michaels Craft stores, the extra-large 4x5ft canvas (which is not easy to transport home in a normal sized car, so that is another issue) was $50...plus then all the other parts to complete the project; another $40 probably. Not bad. I can do better, though. How about I purchase the 24x30 canvases (4 of them) for less, then assemble them together with bolts and upholster away?! I was able to find a sale where the four smaller canvases were $7 each...if you can only find them for $10 each, you probably will want to go with the larger 4x5ft canvas for step one, and call it a day (trust me, you will save yourself a lot of steps and grief). Bolts were about another $5. This is how I did it...
First I measured (carefully) and drilled holes where the bolts would go through both canvases so that I could attach them together. Then, using the 3.5 inch carriage bolts and nuts, I attached all the canvases together to make one large (fairly) stable surface. (adding the batting and fabric will make it even more stable in the end). Be careful to drill in the middle of the wood, since you don't want to split the frame. (I did pilot holes, and enlarged the drill bit size twice to reduce the strain on the wood as I was drilling.) I know the front of the finished assembled canvases have weird bulges (where my knees were whilst I was finessing the pieces together), but that matters not, because it will be covered by foam, batting and then fabric)...
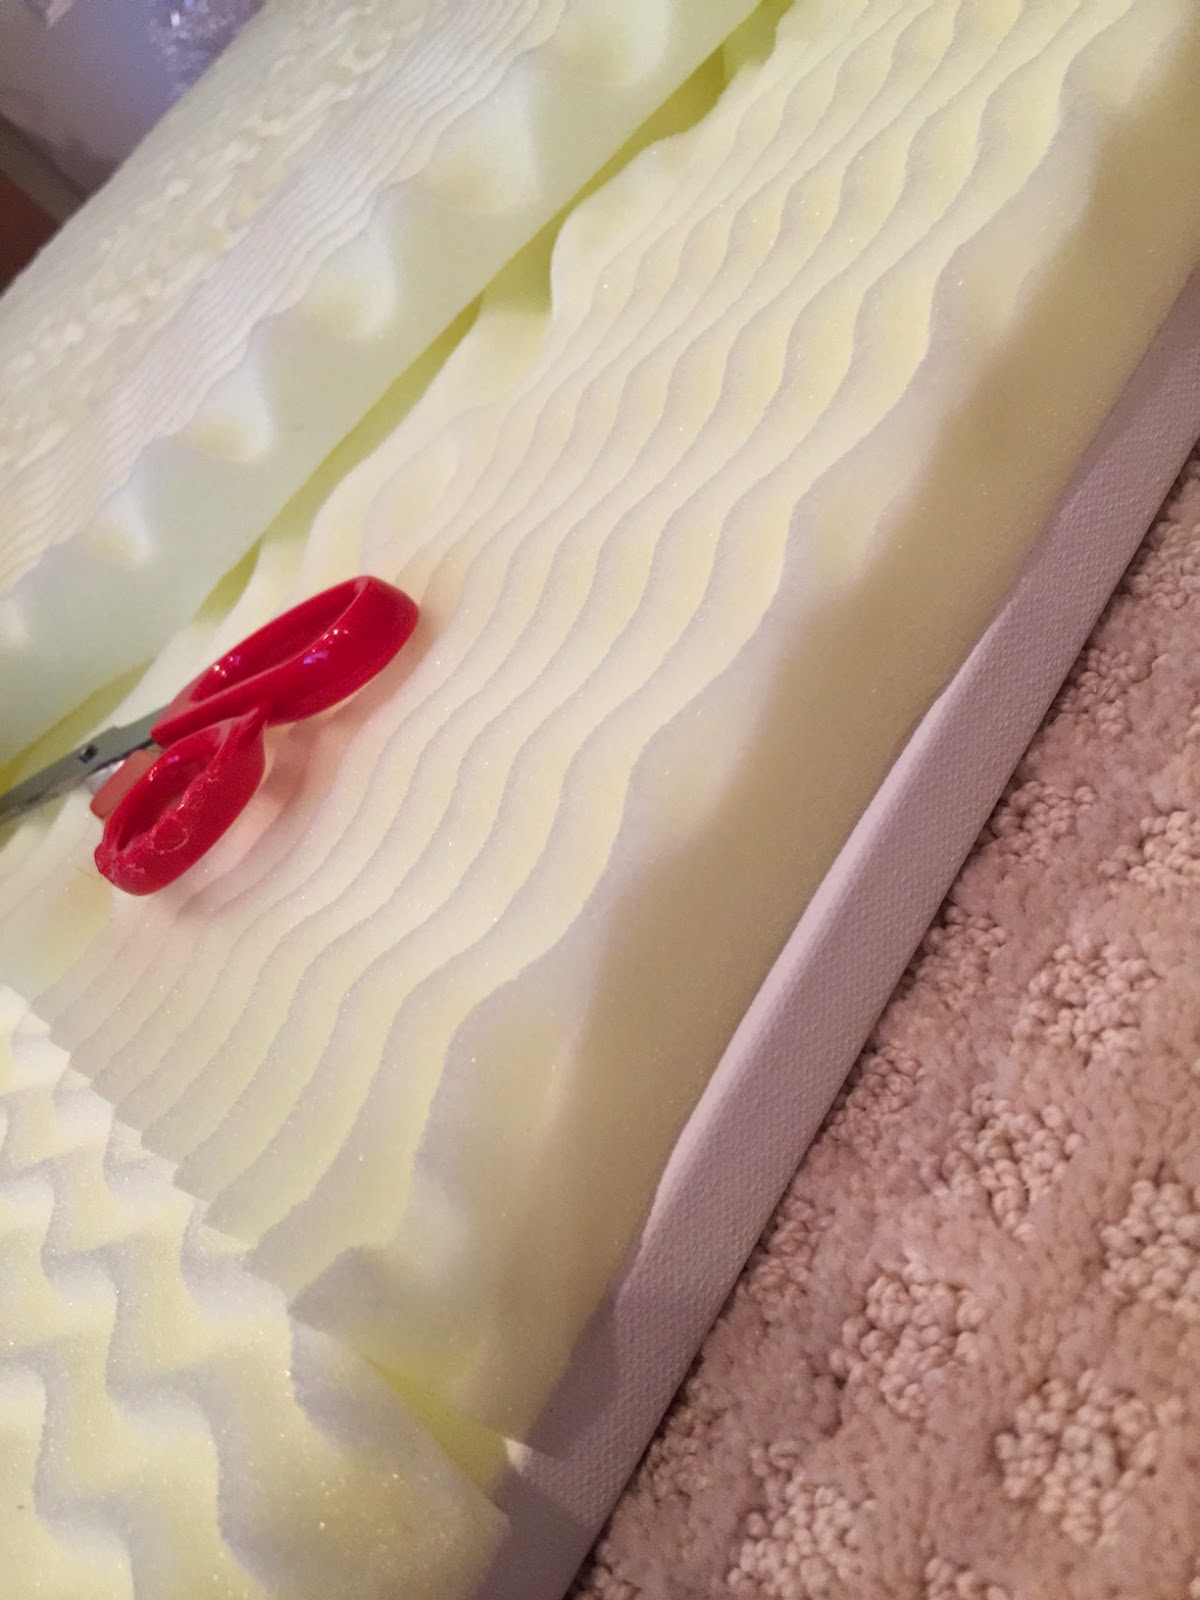
Then I glued the twin-size $15 cheap-o mattress topper foam from Target (with some strategic cuts) onto the canvas surface. They foam doesn't need to be completely budge-proof, but I wanted the pieces to be pretty secure for when I started to upholster (and I didn't want any indentations from staples on the front). The surface of the foam was variegated, but that didn't matter once the batting was in place.
Batting next! I think this was a twin sized quilt batting, and I stretched it to go all the way around to the back on all four sides. Nice and tight... Staple gun them into place about every 4 inches or whatever looks right to you.
Then the fabric...mine was a shower curtain that I already had (waiting to be something cool) that matched the valance and the bed skirt that I had previously made for his room.
Two clearance $15 shower curtains worth of fabric, and I have a very high-end look indeed!
I did some brass nailheads because I love the shine they add, then I strung some STRONG picture wire on the back, two hangers on the wall (for less side-to-side wiggling) and the headboard is good to go!
You can use this to make a smaller or even larger headboard, just adjust the size of the canvases that you buy so that they match the overall width to the head width of the mattress. You can also adjust the thickness of the foam and the batting to get the loft that you like best. If you want to "tuft" it, I would map out ahead of time where you want your buttons to be, then if there is a button where a wood stretcher is, just pre-drill a hole to thread the button string through and secure it on the back side. If there is no wood in the way, use a long upholstery needle to go through the canvas and secure on the backside by tying the string around a small popsicle stick and tying it tightly.
My next headboard will likely be a King-Sized one, covered with Paint Drop Cloth (my favorite Belgian Linen cheat) and with tufts! I will be sure to post snaps of that one too...(I dreamt last night about how to add those cool side wings to it...)
Have fun, fellow DIY dreamers!
P.S. Update: He has used it for a week now, and no problems at all with it being attached to the wall or anything. It looks and acts, for all the world, like a honest-to-goodness headboard!
:) go hawks :)
Thursday, December 26, 2013
DIY Tiered Server from Target Plates
3 Tier Server for a dozen cupcakes! |
Whether you are hosting a party for ten---or a party for yourself...no worries, I would never judge---cupcakes, scones, cookies, tiny sandwiches and bon bons just look more special if they have their own multi-tiered server to tempt you from. Your delighted eye moves up and down, trying to figure out your plan of attack... and just which goody will be snapped up first!
But like many things that I choose to adore (er, obsess over), tiered servers are elusive and often have a price tag to match. Whenever that happens, I dust off my DIY radar and get to hunting on eBay and YouTube to see if I can "create" what I cannot find...for a much more reasonable price. The hardware for the server is readily available on eBay. With many styles (t-bar, ring, oval, heart, etc), in both silver and gold-tone...you can make a veritable forest of servers (if you so desired...say, for a large party or a wedding!) for around $5 per for the connector kits.
Should you wish to dust off your own DIY skills, I am going to make ONE and show you how to do it!
First you will need some parts and tools:
- Tiered server hardware kit (for 2 or 3 levels) here is one on eBay: Tidbit server kit hardware
- Melamine or plastic dishes (plates) for each level (optional bowl for base or top level)
- Drill with a range of bit sizes
- Masking or Painters Tape
Plates and Hardware Unassembled |
Bottom Screw and Washers |
Add painters tape and mark center for drilling. |
First drill small diameter "guide" hole |
Now drill larger hole. |
Elevate plate for drilling. |
Assembling the levels |
You can dismantle the server to change out the plates (and to wash the plates in the sink after the party--be sure to air dry all the parts overnight before re-assembling) and store it when you are not using it with a minimum of space allocated. Note: when I used the bowl as the base, the bottom connector screw (from the kit; a size 6 machine metric) was too short...so I had to go to my local Ace Hardware to get one a little longer. Be sure to keep the shorter screw, though, in case you configure your server with no base---you will notice that you can change up the configuration depending on your needs! See the photos of all the ways you can change it up!
3 Tier: Bowl as Top Level |
Now all of the cupcakes in your life can have a proper presentation before YOU gobble them up in a jiffy!
Monday, April 15, 2013
Adventures in Re-Upholstering
All cleaned up and ready for a good snuggle! |
Good bones, but funky... |
$$$ Linen or Drop Cloth? |
Bought two, washed them and dried them up (to remove any sizing and to shrink them)...they ironed beautifully (however, they are most definitely not 100% cotton, because there was some melting at the highest temp on the iron...at least they will be durable and more washable!)
After spending one whole week taking the chair and the ottoman apart---can I tell you how many staples I pulled with my flathead screwdriver, needle-nose pliers and hammer (when the going got tough)? About eleven thousandy million! The chair wasn't heavy because of the wood--it was mostly metal staples!!! Row after row of the vile things. Like peeling an onion of pain and manicure mangling---and then one whole week putting them back together (with a fair amount of sewing involved because of cushions, single piping and double piping)....oh yeah, I white-washed the wood...
Voila, my chair and ottoman have been up-cycled! I decided to get a little fancy and do an Ikat stencil print on the outside (prior to stapling) in white mixed with ivory latex paint. It was either that or a large stripe down the center (which I could always do later, if the mood strikes). Lucky for me that the insides of the chair (the webbing, the springs, the wadding, the foam cushions) were in perfectly good shape (all the funk was on the outside) and needed only to have a fresh layer of padding to fluff it up.....see honey, there were no mice living in it, after all!
It all turned out pretty darned good! And now it is a week later and my hands have mostly healed up. I recommend two things: when you have a *professional* re-upholster your old smelly chair and the bill is way higher than you thought it should be....just pay the poor guy and smile. Secondly, if a chair starts flirting with you on CL and says it only needs a little help, don't let it anywhere near your bucket list.
Unless you have a solid 40-hour week to devote to the mad task. And you are a wackadoodle like me.
Friday, February 22, 2013
No-Guilt Super-Quick Fresh Raspberry Jam
Who doesn’t want a taste of summer when all you see outside
is gray clouds and raindrops? Lots of
raindrops. Falling sideways, thanks to the
wind. I am a NW gal, born and bred—love me
some green trees, green grass and (bountiful) green moss—but even I have limits
of what I can tolerate…and late February is about my breaking point. So I have devised ways to cope. Seven layers of clothing at once? Instant Bahamas! Darkness getting to you? Turn on ANOTHER lamp (dear husband groans)! Want
to jazz up your tastebuddies? Invent a
new low calorie/zero sugar/super quick and easy fresh Raspberry Jam that is
ready in about 3 minutes flat!
Here’s how to make the jam:
1. Frozen Raspberries
are perfect for this (don’t waste the fresh ones unless they are just about to
grow fuzz and you have no other ideas of how to save them)…you will want about
a cup. Put them into a microwave safe
bowl or Pyrex glass measuring cup (2-cup capacity, at least). Zap-a-roony the berries in the micro for
about a minute. If they still look
frozey, then zap them for another 20-30 seconds. Then take the back of a spoon and smash them
down and stir them around until they are mostly liquid—if they are not very
juicy, you can add a little bit of water to get them into a nice mashed state.
(BTW, 1 cup of raspberries = 60 calories and lots of natural fiber)
2. In a small pinch
bowl (or ramekin) measure 1 tablespoon of cornstarch (1 tbsp = 30 calories) and
then 1 tablespoon of COLD water (warm/hot water activates the thickening
process, and you don’t want that to happen yet…) and mix well, until there are
no clumps at all in the mixture. It will
look milky.
3. Add the cornstarch
slurry in a thin stream into the heated raspberry smash. Stir well.
(It will look like you added milk to the raspberries). You can go ahead
and add your preferred sweetener at this point…I like to add a couple of stevia
packets along with a Xylitol (sugar alcohol granules that actually promote good
dental health and the re-mineralizing of tooth enamel) packet, and mix that in
as well. The stevia adds no calories,
and the Xylitol adds 10 calories for a 4 gram packet. A few drops of lemon juice is a nice “brightening”
flavor also, if you so desire.
4. Back into the microwave for about 40 seconds, or until it
looks less watery and more solid. If it is still milky looking, try another 20 seconds...when you are done, the
edges will look a little dodgy/dark, but just give the whole thing a good stir
and you are done! Hot jam!
5. Now make the toast
and enjoy your bite of summer!
This lasts for about 3
days in the fridge, covered. If you eat
about ¼ of your batch, you have given yourself a nice boost of fruit and only
about 25 calories. A no-guilt splurge!
You can do basically
the same thing with frozen strawberries & blueberries. I like to add the “jam” to plain yogurt, vanilla
ice cream, and to spread it on pancakes …you can even add more water in the in
the final microwave step, and that will give you a less thickened texture and
more syrup-y, perfect for pouring.
Speaking of pouring, yes, it is still raining sideways. Only 132 days until July 4th; stay
strong Seattleites!
Subscribe to:
Posts (Atom)